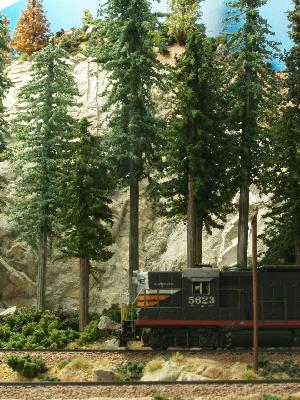
The pine trees come from my friend Bob Mitchell at Perfect Pines. Most of the rest of the foilage is from Woodland Scenics products. I built it using Woodland Scenics plaster cloth over taped newspaper and strip cardboard forms (I hate foam and rarely use it - awful nasty stuff; breathing the dust will harm your health, so cut it with a knife). I then added plaster rock castings cast and colored at my workbench and attached and blended the castings in using lightweight spackle. Spackle forms the rest of the ground which is textured while wet with stiff brushes and palette knives and then painted with acrylic colors. Rocks, sand and dirt from Arizona Rock & Mineral Co are added to get the right color and texture for the ground. At this point the track is ballasted so it will spill over onto the ground instead of the other way around. I like
to use real rock ballast so I either use Arizona Rock and Mineral
Ballast or Highball products ballast. The Woodland Scenics ballast is
too light and floats away when you try to stick it down with scenic
cement. It is very hard to get nice looking slopes when your ballast
floats on water! Foam bushes in a variety of colors and Silflor grass are added, are added last and everything attached with Scenic Cement. To make my bushes I mix several colors in a tub, add light brown coarse ground foam (for dead leaves) with a bit of light green foam (for new leaves) to make highlights, and mix it all up. The bushes look a lot better this way if they are not all one color only.
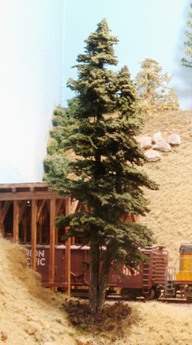
Foreground trees
The best conifers I have seen that you can buy, as opposed to making yourself, are from Canyon Creek Scenics.
What is really cool is that they make non-ordinary trees, such as
double-trunked (such as the tree on the left), dead, burnt, and so forth. These foreground trees are too expensive to buy a
whole forest (at least for most of us), but adding a few in special
locations in front of the track adds a lot to scenes. You can also move
them around for photos. These trees have lots of
lower branch details. You can also add lower branches to other
manufactured trees with a pin to make a hole and some glue such as I did the the Perfect Pines tree on the right. This adds a
lot to the tree.
Grass
Grass can make or break Western scenes. It is hard to find
anything in the hobby store that looks like Western grass to me. Mostly
because the colors are too limited and the it doesn't stand up right.
The static grass doesn't look right to me at all and the foam type of
grass is too short and the wrong texture. All over California, Oregon,
Utah, Wyoming, Montana and Nevada, you see lots and lots of golden,
tall grass. Getting the grass right instantly says "Western scene". The
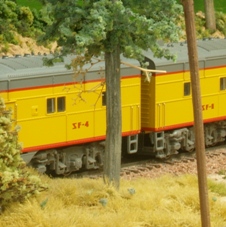
two ways I like to make grass are with faux fur (upper-right picture) and with Silfor
(lower-right picture). The fur, which I buy from Michael's craft stores, needs to clipped to make it shorter. This needs to be
done so that you get random lengths about 1/8 to 1/2 inch long. Then
you need to add color. I take cheap craft paints in the golden and
brown colors and mix them till it looks right. Then I spray this color
into the grass with an airbrush. If you don't have an airbrush you can
paint it on the fur, but then you need to unmat the grass after it
dries with a comb. Cut this into a random shape with scissors and then
glue it down with white glue to the layout. Add bit of green foam to
represent weeds. To hide the edges I use Silfor painted the same color.
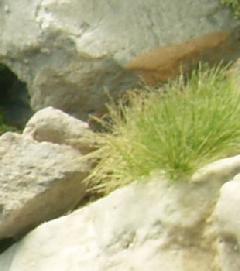
Silflor
is easier - you just peel it off the backing sheet and stick it down.
Like all scenery make it permanent with scenic cement. Again the colors never weem right to me but I have found to color it
all you need to do is dab some thinned paints onto it until it looks
right. This has the advantage of breaking up the monotone color that it
comes in. Buy the lighter colored and add color and you will only need
to buy one color.
What about static grass, you ask? I finally bought one of those static guns and lots of colors of static grass and applied it to a 3 foot section of the layout. Took me all day to glue it down and all day to vacuum up the extra grass that got all over the room. Now I am thinking of replacing it all because it looks like polyester fiber (standing on end) stuck to the ground.... My advice, save your money unless you want to make a manicured lawn.