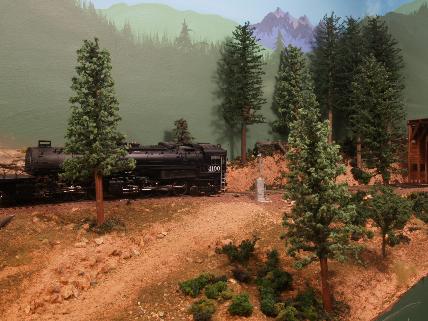
To me there is nothing more satisfying than taking a picture of a model and looking at it for the first time. Somehow the picture is more satisfying in many ways than the actual model. The photo also freezes the model in time and allows enjoying your modeling later. Models after all are fragile and layouts evolve so that a picture becomes a backup of the object that you can save for later. When I say photography I should clarify that I mean digital photography - I haven't take a film photo for many years. To take a good model picture you need (in this order), a model, lighting and a camera. The model is most important - photos will show up imperfections in your modeling like nothing else. Next in importance is good lighting - without good lighting, you cannot capture a good photo no matter how expensive the camera. Last in importance is the camera. A good camera helps but if the first two are lacking, then the best DSLR will not save the day. On the other hand, it is possible to take really good digital photos with an average digital camera.
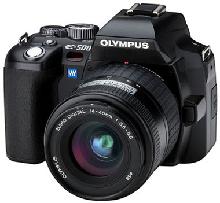
The Camera The best camera for most people is probably a bottom level DSLR or digital single-lens reflex. Not so much because you need a lot of pixels - you don't need all those pixels unless you are making posters - but because of the features of these cameras that give a lot more control over images. My camera is an Olympus E-500 that I got because I had a lot of previous experience with Olympus cameras starting with my beloved OM-1 from college. The Olympae are good cameras but the lenses are pricey (because they are really good). The Canon Digital Rebel is a popular camera for model railroaders and you may be able to get a used one inexpensively. A camera is a good investment. You can use the same camera for model photos, railfanning and even taking pictures of the new baby. When you are looking at a new camera there will be a list of hundreds of features, many of which you will never have any call to use and in fact sometimes I wonder if anybody uses some of the more obscure features EVER. This is a list of features you will find useful:
Aperture priority mode so you can take pictures with the best depth of field
Timer to delay the start of exposure after the mirror flips up (anti-shock)
Remote control so you can take pictures without disturbing the camera
Custom White Balance (WB) compensation so you can get the colors right in any type of light
Megapixels - 2 or more - don't get fooled into buying cameras based solely on the number of megapixels
Tripod mount so you can hold the camera steady during long exposures
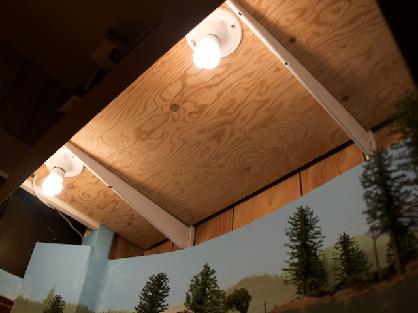
Looking up at the lighting above the layout.
Lighting
It helps to buy some lights or to install good lighting on
your layout. A really good way to light the layout is with a line of
bulbs or tubes above the front edge of the layout with a valence to
keep the light out of your eyes. I use a hardboard valence mounted on
the front of a piece of plywood with el cheapo light sockets mounted
every two feet. This is held up with shelf brackets so that it is
about two feet above the layout. The back of the valence is painted white to reflect light. The closer the lights are to the layout, the closer should be the spacing between them. On a double decked layout a single fluorescent tube will work well to light the lower level - there probably won't be enough depth for individual lights in the upper bench work to light the lower level. In the sockets I put 9 watt compact
fluorescent daylight bulbs. Some modelers prefer 25 watt
incandescents. An advantage of incandescents is you can connect them
to a dimmer. Advantages of fluorescent are longer lifetime, less wasted electricity giving a lower lifetime cost. The new compact fluorescent lights are a far better than the old ones that flickered, buzzed and gave off weird green light. In hindsight I should have used closer spacing between my bulbs but I was being conscious of the cost. To give credit, I got a lot of the details on this type of lighting from reading Model Railroader and from Joe Fugate's Siskiyou Lines website. It is also the lighting scheme that many museums use for their dioramas. With this lighting, you can take a lot of photos with no additional lighting needed.
Take the Picture
Here's how to take a basic layout picture. Build a layout. Weather some locomotives and cars. We will wait for a couple of years while you get this done :-) Set the camera up on a tripod or place it on the layout. The best pictures are taken from a natural point of view which means just above the track. Shooting downwards from above doesn't look natural to us non-helicopter pilots. To get a good depth of field you need to stop the lens down to its smallest aperture - i.e. the highest possible f-stop. The higher the f-stop, the longer the exposure and the greater the depth of field. To do this set the camera on Aperture priority mode ("A" on the dial). Then set the aperature to F22 or better. This will make the exposure time many seconds long so that any camera movement will result in a blurry picture. You will also want to set the shutter delay on the camera to about 5 seconds. On my camera this is called Anti-Shock and it is way down in the menus. The way it works is this: when the mirror flips up in a SLR camera, it causes the camera to vibrate. By delaying the shutter opening, the camera has time to quiet down before the picture is taken. Use your remote shutter control to trigger the camera and wait quietly so you don't vibrate the camera until the exposure is over. Voilá, a picture!
In a later blog I will discuss some of the finer points of lighting, composition and special effects such as smoke.